Perfectly Pears Flap Card
Cards | Markers | Metal Dies | Online Exclusives | Stampin' Up | Tutorials
Sweet layers, vibrant pears, and a clever flap make this card fun to make and a joy to receive!
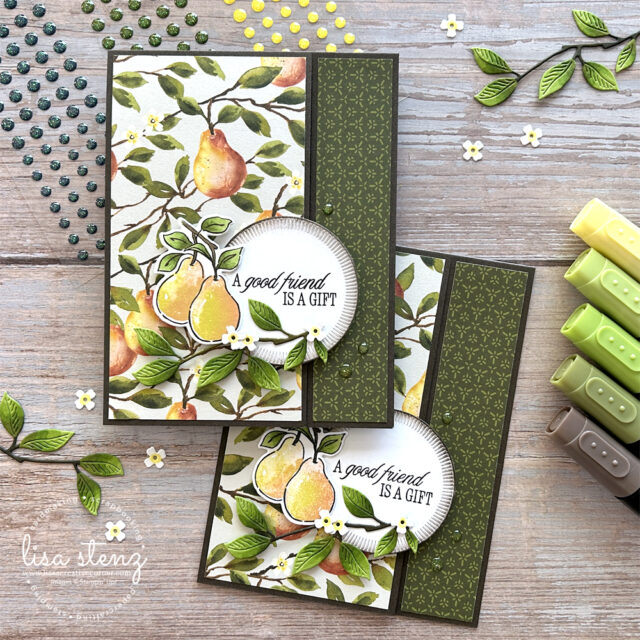
If you’re looking for a fun card design that makes the most of your Designer Series Paper while adding a special touch, you’ll love this Perfectly Pears flap card! It features a creative front flap, quick stamping, and cheerful embellishments, all while using minimal DSP so you can stretch your stash.
Here’s how to make it:
✂️ Measurements & Card Base
- Start with a piece of cardstock measuring 4¼" x 11".
Score it at 5½" to create an A2 size card that opens from the top. - Cut a slit from the bottom up to the score line at 3" from the left side.
- Adhere the small right flap closed, so that only the 3" wide flap on the left side opens.
🎨 Decorate the Front
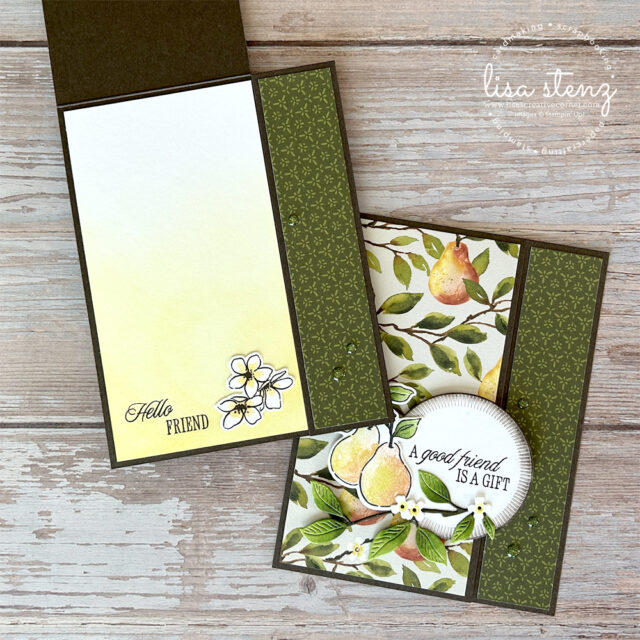
- Add Designer Series Paper (DSP):
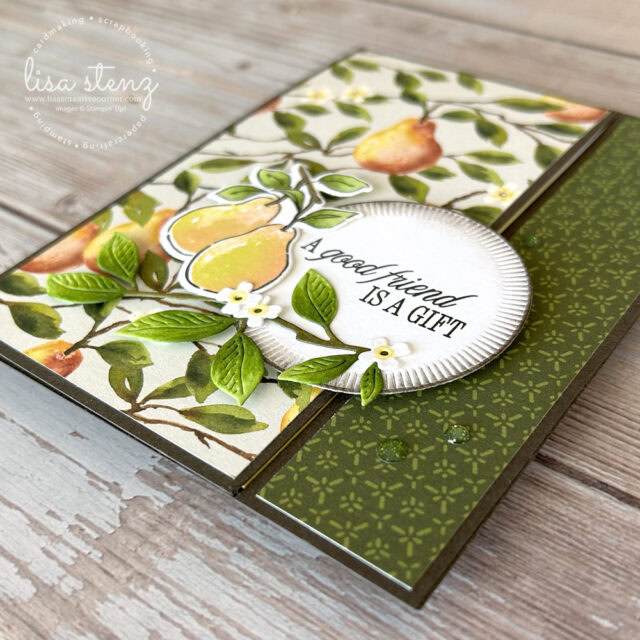
- Adhere a piece of 2¾" x 5¼" DSP to the front left flap. (I used Painterly Pears DSP from Stampin’ Up!)
- Adhere a coordinating 1″ x 5¼" strip of DSP to the right side.
- Create your focal circle:
- Die cut a white circle using one of the Spotlight on Nature circle dies.
- Stamp the sentiment in Early Espresso ink and lightly ink the edges using a Sponge Dauber.
- Adhere the circle to the left flap with Stampin’ Dimensionals.
🍐 Add the Pears & Leaves
- Stamp, color, & die cut the pears:
- Ink the small pears image from the Perfectly Pears bundle in Darling Duckling ink, then sponge a tiny bit of Flirty Flamingo ink on the edges with a dauber before stamping onto white cardstock.
- Stamp the outline image on top with Memento Black ink.
- Use Old Olive and Granny Apple Green Stampin’ Blends to color the leaves.
- Die cut the image and adhere it to the left side of the circle with Dimensionals.
- Add the branch & embellishments:
- Die cut the leafy branch from Granny Apple Green cardstock.
- Color the leaves using the same green Blends markers.
- Color the branch with the dark color from the Deep Blend Combo Pack of Blends markers.
- Adhere the branch under the sentiment and the pears.
- Die cut tiny white flowers, add a dot of Light Lemon Lolly to the centers, and adhere them to the branch.
- Finish with sparkle!
Add three Low Profile Sparkle Dots for the perfect final touch.
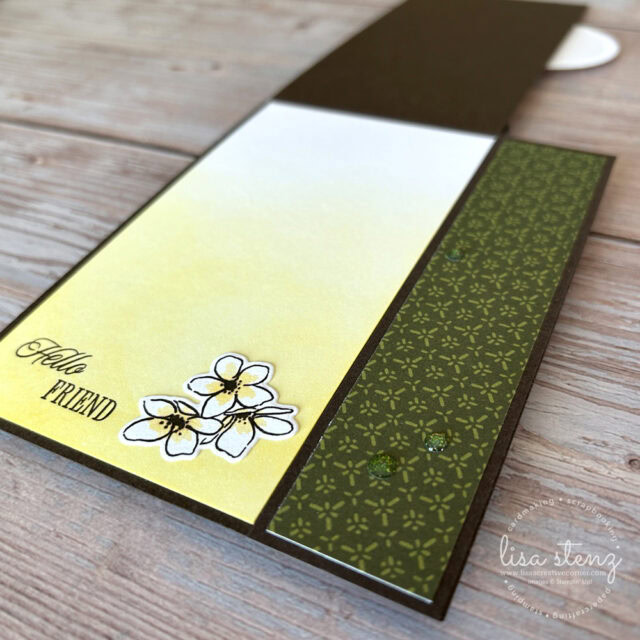
📝 Inside the Card
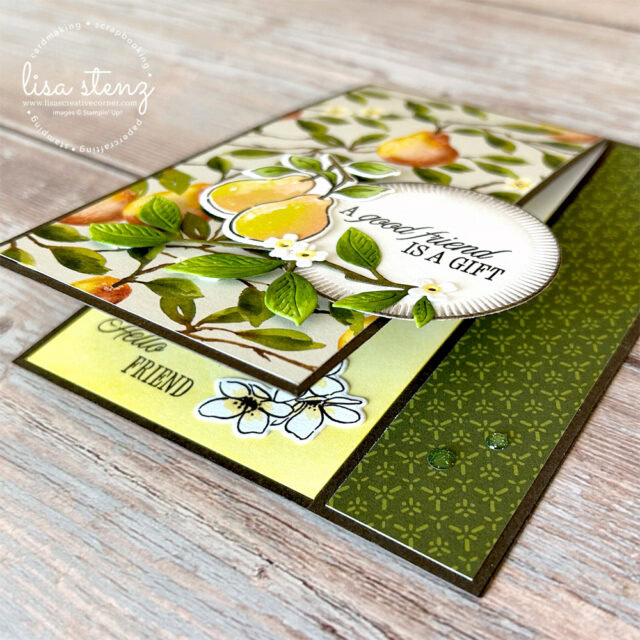
- Add a white panel inside measuring 2⅞" x 5¼".
- Add a soft blend of color to the bottom half with Darling Duckling ink using a Blending Brush.
- Stamp a coordinating sentiment and add a few small stamped or die-cut flowers to carry the theme through.
💡 Tips:
- This design is great for paper-saving! You can get multiple cards from just one sheet of DSP.
- Vary the sentiment to make it work for birthdays, thank you cards, or general encouragement.
- Try this same layout with different patterned papers and stamps for year-round versatility. (Take a peek at my Charming Day kit here for more ideas.)
This project is perfect for crafters who love adding thoughtful detail without making things too complicated. I hope you’ll give it a try!
💛 Happy crafting!
Product List![Perfectly Pears Bundle (English) [ 166154 ]](https://lisascreativecorner.com/wp-content/uploads/2025/07/1d5915aec8904f091149fe2a01578ac9.jpg "Perfectly Pears Bundle (English) [ 166154 ]")
![Painterly Pears 12" X 12" (30.5 X 30.5 Cm) Designer Series Paper [ 166146 ]](https://lisascreativecorner.com/wp-content/uploads/2025/07/c65e84f98358269d42e8c1d0a7fd7901.jpg "Painterly Pears 12\" X 12\" (30.5 X 30.5 Cm) Designer Series Paper [ 166146 ]")
![Spotlight On Nature Dies [ 163580 ]](https://lisascreativecorner.com/wp-content/uploads/2025/07/e15ba5941687a01d3b15fd57527141cb.jpg "Spotlight On Nature Dies [ 163580 ]")
![Low Profile Sparkle Dots [ 166157 ]](https://lisascreativecorner.com/wp-content/uploads/2025/07/e878f39ec26c034ca7cf481f2bc5f588.jpg "Low Profile Sparkle Dots [ 166157 ]")
![Darling Duckling Classic Stampin' Pad [ 165277 ]](https://lisascreativecorner.com/wp-content/uploads/2025/07/097de781e00d90da5d42780d3f98f4e1.jpg "Darling Duckling Classic Stampin' Pad [ 165277 ]")
![Flirty Flamingo Classic Stampin' Pad [ 147052 ]](https://lisascreativecorner.com/wp-content/uploads/2025/07/262ce2c6aa520ac7c81ff5b70204be42.jpg "Flirty Flamingo Classic Stampin' Pad [ 147052 ]")
![Early Espresso Classic Stampin' Pad [ 147114 ]](https://lisascreativecorner.com/wp-content/uploads/2025/07/847b0318bad12e9bb38749cb4c42503a-1.jpg "Early Espresso Classic Stampin' Pad [ 147114 ]")
![Tuxedo Black Memento Ink Pad [ 132708 ]](https://lisascreativecorner.com/wp-content/uploads/2025/07/89bd7278b062cae183ee334b221c9dcd-2.jpg "Tuxedo Black Memento Ink Pad [ 132708 ]")
![Basic White 8 1/2" X 11" Thick Cardstock [ 159229 ]](https://lisascreativecorner.com/wp-content/uploads/2025/07/8c2a8a3b8ff25be10ec2d7cecdaecf11-2.jpg "Basic White 8 1/2\" X 11\" Thick Cardstock [ 159229 ]")
![Granny Apple Green 8-1/2" X 11" Cardstock [ 146990 ]](https://lisascreativecorner.com/wp-content/uploads/2025/07/d13546e4311e21d711ec5569f986f9d5.jpg "Granny Apple Green 8-1/2\" X 11\" Cardstock [ 146990 ]")
![Early Espresso 8-1/2" X 11" Cardstock [ 119686 ]](https://lisascreativecorner.com/wp-content/uploads/2025/07/026fbe988401090731381a32b8803c32-1.jpg "Early Espresso 8-1/2\" X 11\" Cardstock [ 119686 ]")
![Stampin’ Blends Deep Combo Pack [ 158152 ]](https://lisascreativecorner.com/wp-content/uploads/2025/07/61cb85275fd294fa1c0221251a45472e-1.jpg "Stampin’ Blends Deep Combo Pack [ 158152 ]")
![Old Olive Stampin' Blends Combo Pack [ 154892 ]](https://lisascreativecorner.com/wp-content/uploads/2025/07/e41c649f9f147a357a1181b97fdb33c8-1.jpg "Old Olive Stampin' Blends Combo Pack [ 154892 ]")
![Granny Apple Green Stampin' Blends Combo Pack [ 154885 ]](https://lisascreativecorner.com/wp-content/uploads/2025/07/2abbe2f3b7b62ac60f6133d08fdec3b3-1.jpg "Granny Apple Green Stampin' Blends Combo Pack [ 154885 ]")
![Lemon Lolly Stampin’ Blends Combo Pack [ 161673 ]](https://lisascreativecorner.com/wp-content/uploads/2025/07/f3758770c5847ca165cacab91e940357.jpg "Lemon Lolly Stampin’ Blends Combo Pack [ 161673 ]")
![Sponge Daubers [ 133773 ]](https://lisascreativecorner.com/wp-content/uploads/2025/07/967ade1993a15d8f7edfa352753233e4-1.jpg "Sponge Daubers [ 133773 ]")
![Blending Brushes [ 153611 ]](https://lisascreativecorner.com/wp-content/uploads/2025/07/d18bb46238fe494e56152942490a1552.jpg "Blending Brushes [ 153611 ]")
![Multipurpose Liquid Glue [ 110755 ]](https://lisascreativecorner.com/wp-content/uploads/2025/07/cbf2e687070fce5a1db2dd5ae70f80bd-1.jpg "Multipurpose Liquid Glue [ 110755 ]")
![Stampin' Dimensionals [ 104430 ]](https://lisascreativecorner.com/wp-content/uploads/2025/07/40efb008ee05b6faec44ebafc8937e58-2.jpg "Stampin' Dimensionals [ 104430 ]")
![Mini Stampin' Dimensionals [ 144108 ]](https://lisascreativecorner.com/wp-content/uploads/2025/07/dd5ef75bd31a32ecdc6a140a2d9ad7db-1.jpg "Mini Stampin' Dimensionals [ 144108 ]")


Very pretty card thanks for sharing it.
Thank you so much! I’m so glad you like it. 🍐
I love this! I didn’t know what to do with this piece of DSP from Painterly Pears. Thank you! Subscribing!
I’m so glad you like the card Sandy! It’s a fun way to use some of the busier DSP papers. Thanks for visiting my blog and subscribing! 😊