My First Card with the NEW Stampin’ Up! Hot Foil System | Garden Silhouette & Butterfly Flight with Vellum
The wait is finally over! The NEW Stampin’ Up! Hot Foil System is now available to order, and I’m so excited to share my very first project made with it. I couldn’t wait to start experimenting, and for my first project I decided to pair two of the beautiful new Hot Foil Dies with one of my favorite techniques…coloring on vellum.
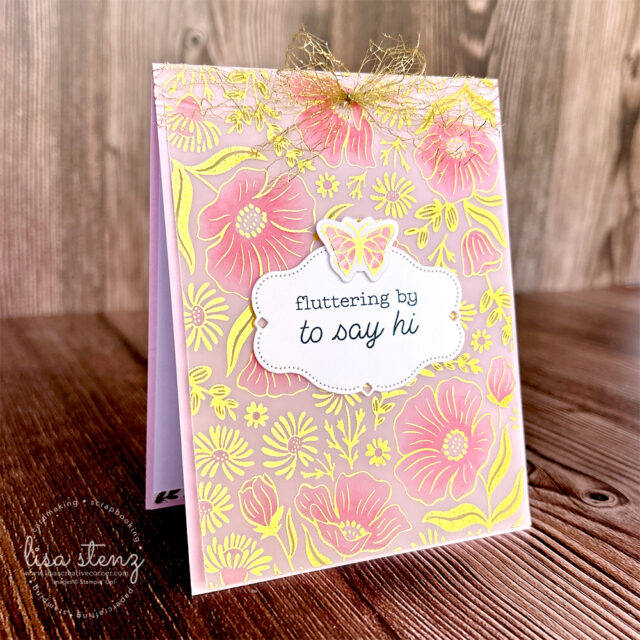
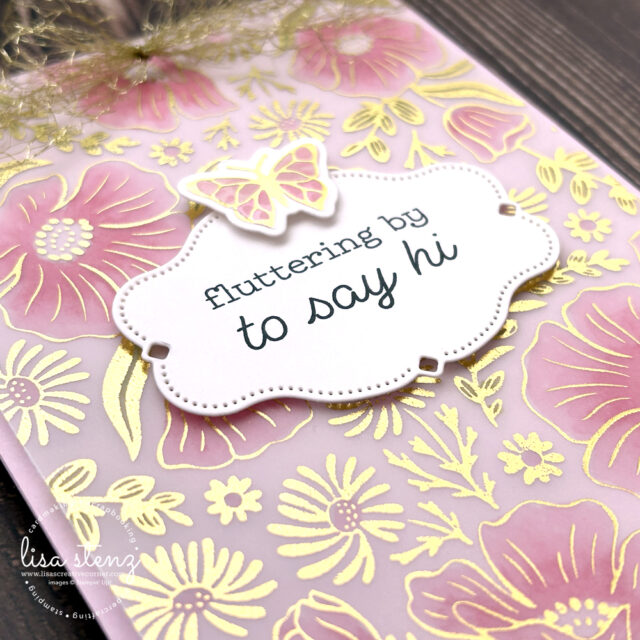
For the background, I used the Garden Silhouette Hot Foil Die with Gold Foil on Vellum. After foiling the design, I flipped the vellum over and colored the back using Flirty Flamingo and Granny Apple Green Stampin’ Blends. Coloring from the back gives the flowers a beautiful, soft look while allowing the gold foiling to remain bright and crisp on the front. Before adhering the vellum to the front, I trimmed a thin strip from the panel and saved it to use on the inside of the card.
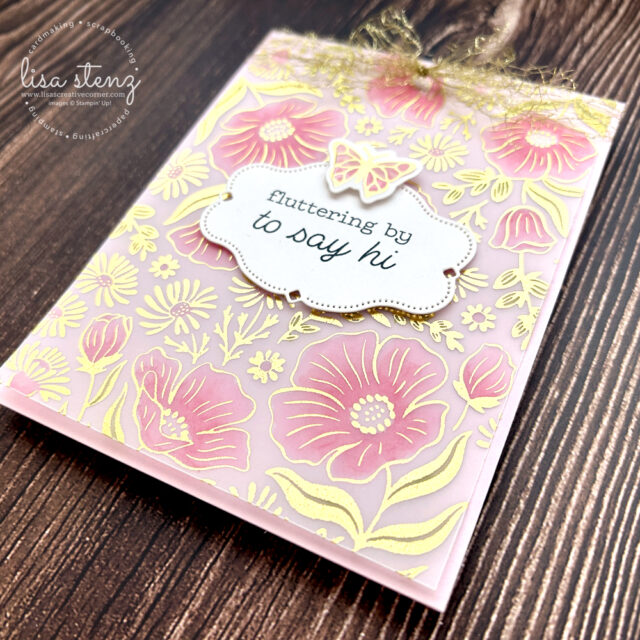
I layered the vellum over a Bubble Bath cardstock base, securing it with a narrow strip of Tear & Tape hidden beneath a bow of Gold Open Weave Trim. The delicate gold bow adds just the right amount of texture without taking away from the beautiful foiled background.
To embellish the front, I created the butterflies using the Butterfly Flight Hot Foil Bundle. After foiling, I added color with the coordinating layering masks by blending Barely Blush, Bubble Bath, and Strawberry Slush ink before die cutting the butterflies with the coordinating die. I love how the layered inks create soft dimension while allowing the gold foil to shine through.
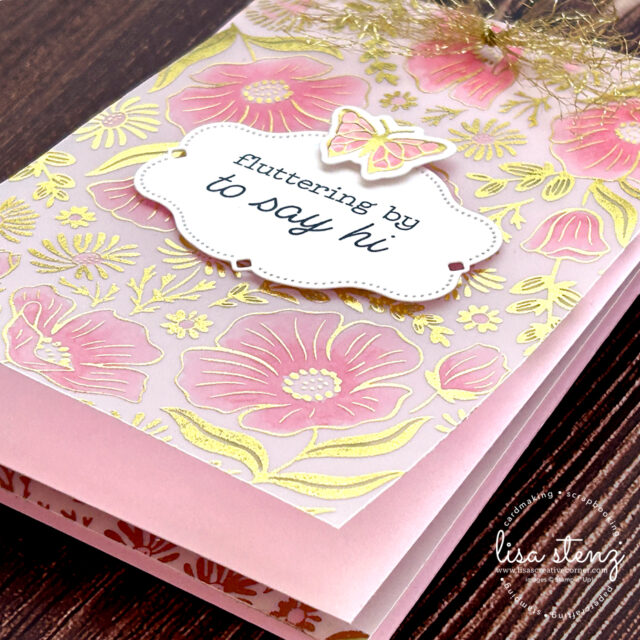
The greeting is from the All Aflutter Stamp Set and is stamped on Basic White cardstock. I cut it out using one of the labels from the Sweet Words & Labels Dies, then popped it up with Stampin’ Dimensionals for a little extra depth.
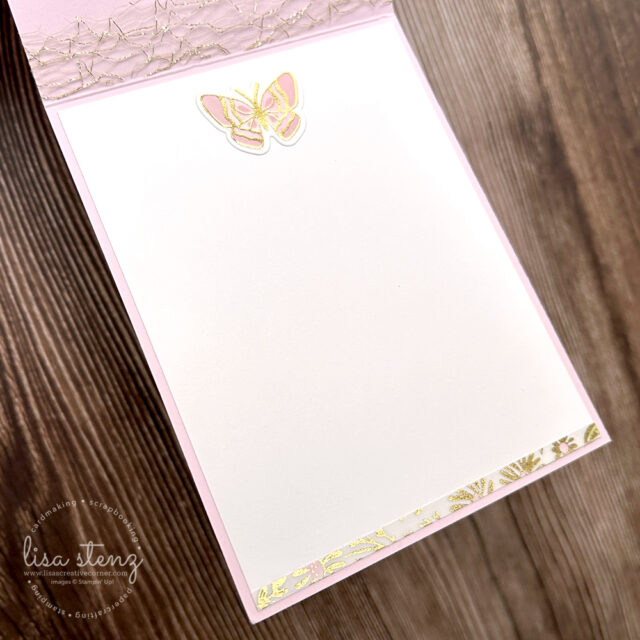
I adhered the thin strip strip of vellum I cut cut earlier to the bottom of the inside of the card. I also added one of the extra foiled butterflies to the inside, creating a coordinated finish that carries the design throughout the entire project.
This card was so much fun to create and was the perfect first project with the new Hot Foil System. I was amazed at how easy it was to achieve such elegant results, and I already have so many ideas for future projects. From different colors of foil, to hot foil dies, to coordinating stamp sets, masks, and cutting dies, this system opens up so many creative possibilities!
The Stampin’ Up! Hot Foil System is available to order now! If you’ve been waiting to add gorgeous metallic details to your handmade cards, now is the perfect time to get yours. Because Stampin’ Up! expects the first release to sell out quickly, I recommend placing your order before they’re gone. See this post for more info on the system and the free class you can get when you order it before January 4, 2027.
And, as always, your order will also earn:
- Stampin’ Rewards (when you opt in with your Stampin’ Up! online account)
- Points toward Lisa’s Loyalty Rewards Program
- Go towards qualifying for the Product of the Month
Stay tuned for lots more Hot Foil inspiration coming soon…
Product List![Stampin' Hot Foil System Na & Craft Class [ 170009 ]](https://lisascreativecorner.com/wp-content/uploads/2026/07/e78467ce681c316780210bb09fceeab2.jpg "Stampin' Hot Foil System Na & Craft Class [ 170009 ]")
![Garden Silhouette Hot Foil Die [ 170041 ]](https://lisascreativecorner.com/wp-content/uploads/2026/07/d2330ca6cc52e744ac5028ab51941f51.jpg "Garden Silhouette Hot Foil Die [ 170041 ]")
![Butterfly Flight Bundle [ 170065 ]](https://lisascreativecorner.com/wp-content/uploads/2026/07/f0b54d8658bfcc9698dc11b570c8f530.jpg "Butterfly Flight Bundle [ 170065 ]")
![Gold Stampin' Hot Foil Rolls [ 170066 ]](https://lisascreativecorner.com/wp-content/uploads/2026/07/0b06e7bcd39174c2711511e21a2ee790.jpg "Gold Stampin' Hot Foil Rolls [ 170066 ]")
![All Aflutter Bundle (English) [ 167570 ]](https://lisascreativecorner.com/wp-content/uploads/2026/07/1fcbd833154d1bff18b1e233867f77fa.jpg "All Aflutter Bundle (English) [ 167570 ]")
![Sweet Words & Labels Bundle [ 167628 ]](https://lisascreativecorner.com/wp-content/uploads/2026/07/9a941643f2f460a10a46f282a1788ec5.jpg "Sweet Words & Labels Bundle [ 167628 ]")
![Bubble Bath 8 1/2" X 11" Cardstock [ 161718 ]](https://lisascreativecorner.com/wp-content/uploads/2026/07/838dcbd3dd87f57710521561654f1f60.jpg "Bubble Bath 8 1/2\" X 11\" Cardstock [ 161718 ]")
![Basic White 8 1/2" X 11" Cardstock [ 166780 ]](https://lisascreativecorner.com/wp-content/uploads/2026/07/a372c999e3e7e785c75dd7bad5bad3e4.jpg "Basic White 8 1/2\" X 11\" Cardstock [ 166780 ]")
![Vellum 12" X 12" (30.5 X 30.5 Cm) Specialty Paper [ 167099 ]](https://lisascreativecorner.com/wp-content/uploads/2026/07/67c81ee9a4c0c9eed8be0e2bb1604e3f.jpg "Vellum 12\" X 12\" (30.5 X 30.5 Cm) Specialty Paper [ 167099 ]")
![Gold 1 1/2" (3.8 Cm) Open Weave Trim [ 165715 ]](https://lisascreativecorner.com/wp-content/uploads/2026/07/37c6b4e0d6e04602b4170f4b7e445963.jpg "Gold 1 1/2\" (3.8 Cm) Open Weave Trim [ 165715 ]")
![Barely Blush Classic Stampin Pad [ 167678 ]](https://lisascreativecorner.com/wp-content/uploads/2026/07/40bfadb0e532294275a839b7f8ee6cfe.jpg "Barely Blush Classic Stampin Pad [ 167678 ]")
![Bubble Bath Classic Stampin' Pad [ 161664 ]](https://lisascreativecorner.com/wp-content/uploads/2026/07/9fbd3808724c0b1bff5e0d19aa8138e7.jpg "Bubble Bath Classic Stampin' Pad [ 161664 ]")
![Strawberry Slush Classic Stampin' Pad [ 165286 ]](https://lisascreativecorner.com/wp-content/uploads/2026/07/3df997399bbfb59790e4d8524f69b6b8.jpg "Strawberry Slush Classic Stampin' Pad [ 165286 ]")
![Secret Sea Classic Stampin' Pad [ 165285 ]](https://lisascreativecorner.com/wp-content/uploads/2026/07/26befe42d82e279226f7f60fbaf639d9.jpg "Secret Sea Classic Stampin' Pad [ 165285 ]")
![Flirty Flamingo Stampin' Blends Combo Pack [ 154884 ]](https://lisascreativecorner.com/wp-content/uploads/2026/07/918d761fda70e26f7173bac653a3d29e.jpg "Flirty Flamingo Stampin' Blends Combo Pack [ 154884 ]")
![Granny Apple Green Stampin' Blends Combo Pack [ 154885 ]](https://lisascreativecorner.com/wp-content/uploads/2026/07/2abbe2f3b7b62ac60f6133d08fdec3b3.jpg "Granny Apple Green Stampin' Blends Combo Pack [ 154885 ]")
![Stampin' Cut & Emboss Machine [ 149653 ]](https://lisascreativecorner.com/wp-content/uploads/2026/07/909f32cc4d93a35369fa22db36e19902.jpg "Stampin' Cut & Emboss Machine [ 149653 ]")
![Blending Brushes [ 153611 ]](https://lisascreativecorner.com/wp-content/uploads/2026/07/d18bb46238fe494e56152942490a1552.jpg "Blending Brushes [ 153611 ]")
![Tear & Tape Adhesive [ 154031 ]](https://lisascreativecorner.com/wp-content/uploads/2026/07/56dcc85d3a04b20b17bfba1e80b1b096.jpg "Tear & Tape Adhesive [ 154031 ]")
![Stampin' Dimensionals [ 104430 ]](https://lisascreativecorner.com/wp-content/uploads/2026/07/40efb008ee05b6faec44ebafc8937e58.jpg "Stampin' Dimensionals [ 104430 ]")