Clean & Simple Birthday Card Using Hot Foil Negative Pieces
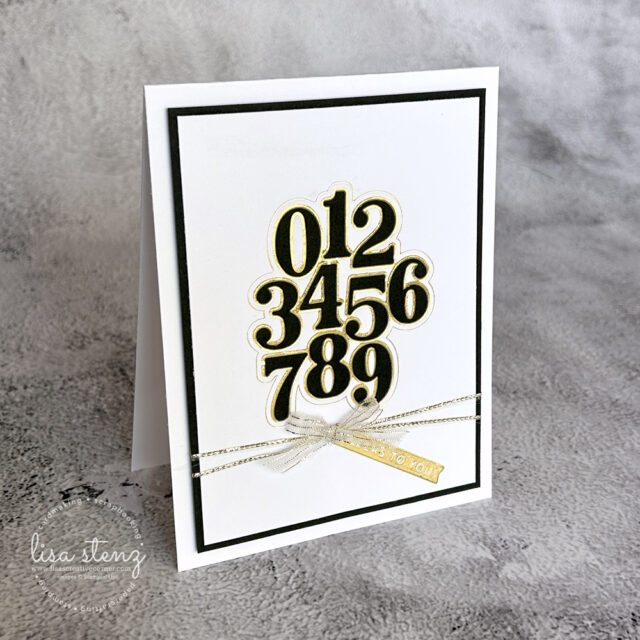
One of my favorite things about the new Stampin’ Up! Hot Foil System is that it encourages you to look at your leftovers in a whole new way. After creating a project, you’re often left with beautiful foiled negative pieces that are simply too pretty to throw away. Today’s clean and simple birthday card is the perfect example of turning those leftovers into something elegant!
For this card, I used the Luxe Alphabet & Numbers Hot Foil Dies along with the coordinating cutting dies. Instead of featuring the individual foiled die-cut numbers themselves (like I did on yesterday’s card), I made the negative piece the star of this card.
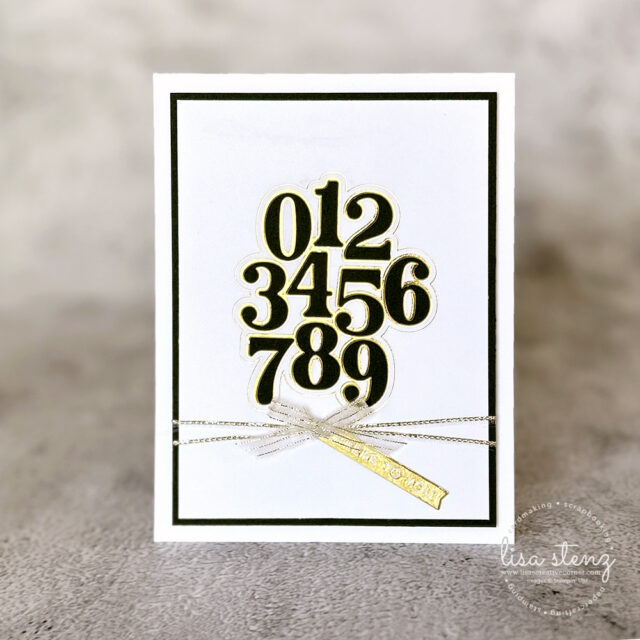
The Basic White cardstock negative piece from yesterday’s card became my focal point for today’s card. I layered it onto a piece of Basic Black cardstock, then carefully adhered all of the tiny centers of the numbers that I saved back into place. It creates such a striking look with very little effort.
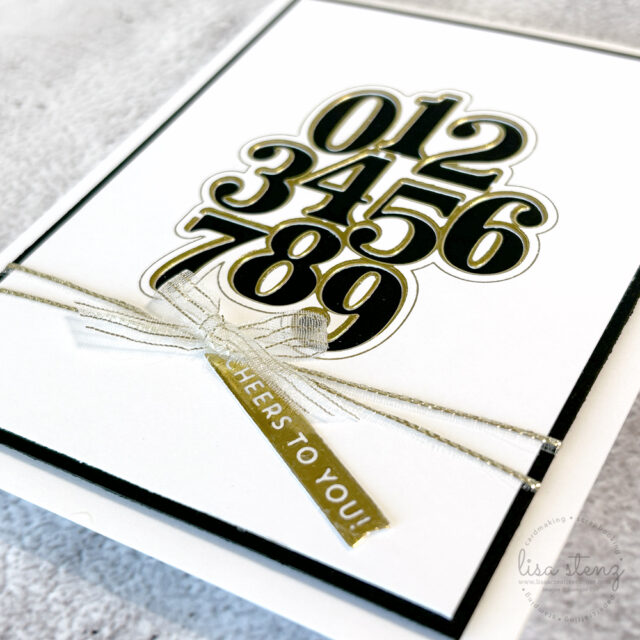
To add a little elegance, I trimmed the outside gold strands from the Gold Striped 3/8″ Mesh Ribbon and wrapped them around the layered panel. I then used the remaining center mesh portion of the ribbon to tie a delicate bow and attached it with a Glue Dot. The entire panel was popped up on a Basic White card base with Stampin’ Dimensionals for a little extra dimension.
For the sentiment, I wanted to continue the theme of making the most of every piece. I saved the negative gold foil from yesterday’s card after I hot foiled the Sweetly Sentimental Hot Foil Dies onto Hydrangea Hue two-tone cardstock. The leftover foiled negative piece was too beautiful to waste, so I adhered it to a piece of Basic White cardstock using an Adhesive Sheet before die cutting it with the coordinating die. This created gorgeous gold and white sentiment pieces. I finished the card by adhering the “Cheers to You” sentiment piece under the bow so it looks like a delicate little tag hanging down.
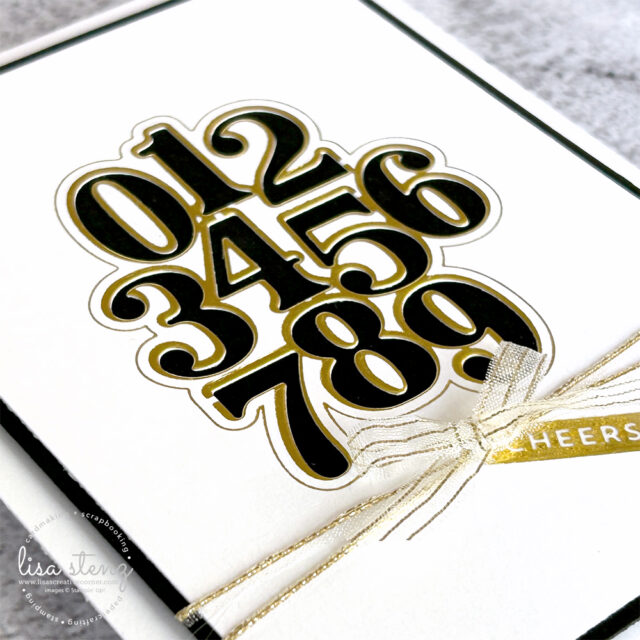
I love how this design proves that sometimes the “leftovers” become the highlight of the project. Not only do you create one beautiful card, but you also have all of the negative die-cut pieces ready to use on future projects, making the most of every bit of foil.
Have you tried creating with the negative pieces from your hot foiling yet? It’s a fun way to stretch your supplies and create elegant cards with almost no waste. I hope this project inspires you to look at those leftover foiled pieces a little differently!
Product List![Stampin' Hot Foil System Na & Craft Class [ 170009 ]](https://lisascreativecorner.com/wp-content/uploads/2026/07/e78467ce681c316780210bb09fceeab2-1.jpg "Stampin' Hot Foil System Na & Craft Class [ 170009 ]")
![Luxe Alphabet & Numbers Hot Foil Dies [ 170044 ]](https://lisascreativecorner.com/wp-content/uploads/2026/07/828fcf98304cb1a20b12dbafa76c71a8.jpg "Luxe Alphabet & Numbers Hot Foil Dies [ 170044 ]")
![Sweetly Sentimental Hot Foil Dies (English) [ 170052 ]](https://lisascreativecorner.com/wp-content/uploads/2026/07/a12ee5a9038ae5579e17f14f655dc4b8.jpg "Sweetly Sentimental Hot Foil Dies (English) [ 170052 ]")
![Gold Stampin' Hot Foil Rolls [ 170066 ]](https://lisascreativecorner.com/wp-content/uploads/2026/07/0b06e7bcd39174c2711511e21a2ee790-1.jpg "Gold Stampin' Hot Foil Rolls [ 170066 ]")
![Gold Striped 3/8" (1 Cm) Mesh Ribbon [ 165599 ]](https://lisascreativecorner.com/wp-content/uploads/2026/07/4a4b9577da1d511670a7984f2f45f676.jpg "Gold Striped 3/8\" (1 Cm) Mesh Ribbon [ 165599 ]")
![Basic White 8 1/2" X 11" Cardstock [ 166780 ]](https://lisascreativecorner.com/wp-content/uploads/2026/07/a372c999e3e7e785c75dd7bad5bad3e4-1.jpg "Basic White 8 1/2\" X 11\" Cardstock [ 166780 ]")
![Basic Black 8-1/2" X 11" Cardstock [ 121045 ]](https://lisascreativecorner.com/wp-content/uploads/2026/07/30e769a1564c770c7df1de462a634fd8.jpg "Basic Black 8-1/2\" X 11\" Cardstock [ 121045 ]")
![Mini Glue Dots [ 103683 ]](https://lisascreativecorner.com/wp-content/uploads/2026/07/0cc098c39226f3139c89e8a433fc640c-1.jpg "Mini Glue Dots [ 103683 ]")
![Adhesive Sheets [ 152334 ]](https://lisascreativecorner.com/wp-content/uploads/2026/07/fd31cfc385d68cb462b3d3ea84503f12.jpg "Adhesive Sheets [ 152334 ]")
![Multipurpose Liquid Glue [ 110755 ]](https://lisascreativecorner.com/wp-content/uploads/2026/07/cbf2e687070fce5a1db2dd5ae70f80bd.jpg "Multipurpose Liquid Glue [ 110755 ]")
![Stampin' Dimensionals [ 104430 ]](https://lisascreativecorner.com/wp-content/uploads/2026/07/40efb008ee05b6faec44ebafc8937e58-1.jpg "Stampin' Dimensionals [ 104430 ]")
![Stampin' Cut & Emboss Machine [ 149653 ]](https://lisascreativecorner.com/wp-content/uploads/2026/07/909f32cc4d93a35369fa22db36e19902-1.jpg "Stampin' Cut & Emboss Machine [ 149653 ]")