Elegant 50th Birthday Card with Gold Hot Foil Details
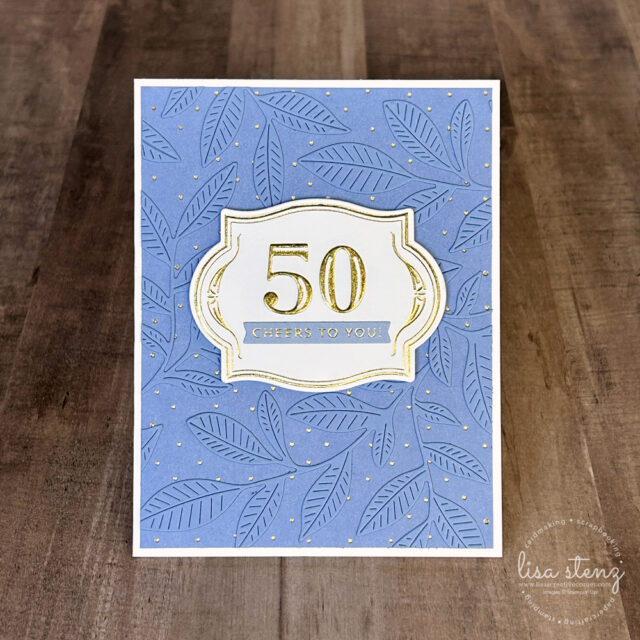
I’m having so much fun experimenting with the new Stampin’ Up! Hot Foil System, and today’s project combines several of my favorite products to create an elegant milestone birthday card. The gold foiling paired with soft Hydrangea Hue Two-Tone Cardstock creates a beautiful combination that’s perfect for celebrating a special birthday.
The background may look intricate, but it’s actually very simple to create by layering hot foiling with die-cut elements.
I started by using the Swiss Dot Hot Foil Die to hot foil the dark side of a piece of Hydrangea Hue Two-Tone Cardstock with Gold Foil. The tiny gold dots add just the right amount of sparkle while still keeping the background clean and elegant.
To add texture and interest, I placed an Adhesive Sheet on the light side of another piece of Hydrangea Hue Two-Tone Cardstock before die cutting three of the large leaf images from the Nature’s Symphony Dies. Using the adhesive sheet made it quick and easy to attach the delicate die cuts to the foiled background. Once the leaves were in place, I simply trimmed away any pieces that extended beyond the edges and adhered the finished panel to a Basic White Thick Cardstock card base.
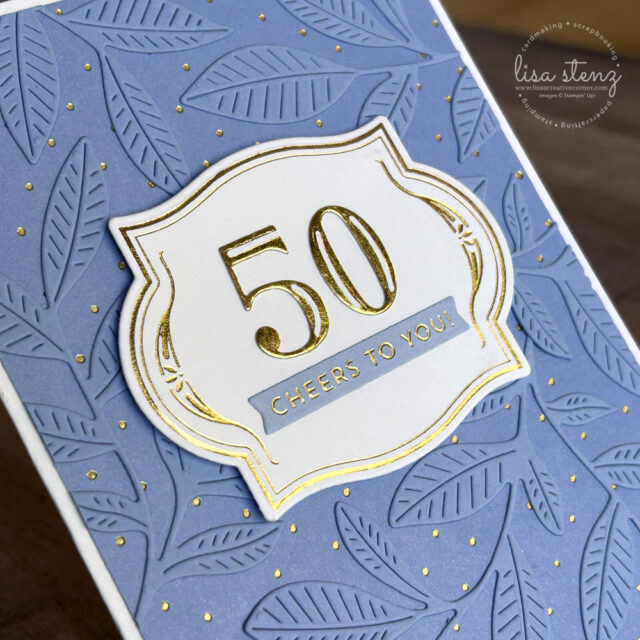
For the centerpiece, I hot foiled one of the beautiful labels from the Flourish & Frames Hot Foil Dies using Gold Foil and die cut it with the coordinating die.
Next, I added an Adhesive Sheet to the back of a piece of Basic White cardstock before hot foiling the Luxe Alphabet & Numbers Hot Foil Dies with Gold Foil. After die cutting the numbers with the coordinating dies, I adhered the “5” and “0” to the frame to create a bold focal point.
To finish the sentiment, I hot foiled the Sweetly Sentimental Hot Foil Dies onto the light side of Hydrangea Hue Two-Tone Cardstock using Gold Foil and die cut it with the coordinating die. The soft blue sentiment strip coordinates perfectly with the background while allowing the gold foiling to shine. I adhered the “Cheers to You” sentiment beneath the numbers and attached the completed frame to the card using Stampin’ Dimensionals.
The finished card has plenty of elegant shine while maintaining a soft, sophisticated look. I especially love how the gold foiling ties every element together, from the dotted background to the frame, numbers, and sentiment.
I love how easy the Hot Foil System makes it to add luxurious metallic accents to handmade cards. Whether you’re creating milestone birthday cards or everyday greetings, a touch of gold foil instantly elevates your projects and makes them feel extra special. Check back tomorrow as I have another card to share using the negative pieces from today’s card!
Product List![Stampin' Hot Foil System Na & Craft Class [ 170009 ]](https://lisascreativecorner.com/wp-content/uploads/2026/07/e78467ce681c316780210bb09fceeab2-2.jpg "Stampin' Hot Foil System Na & Craft Class [ 170009 ]")
![Stampin' Cut & Emboss Machine [ 149653 ]](https://lisascreativecorner.com/wp-content/uploads/2026/07/909f32cc4d93a35369fa22db36e19902-2.jpg "Stampin' Cut & Emboss Machine [ 149653 ]")
![Swiss Dots Hot Foil Die [ 170075 ]](https://lisascreativecorner.com/wp-content/uploads/2026/07/f901d09f254da8fcdbdc6e26eb2bead9.jpg "Swiss Dots Hot Foil Die [ 170075 ]")
![Luxe Alphabet & Numbers Hot Foil Dies [ 170044 ]](https://lisascreativecorner.com/wp-content/uploads/2026/07/828fcf98304cb1a20b12dbafa76c71a8-1.jpg "Luxe Alphabet & Numbers Hot Foil Dies [ 170044 ]")
![Flourish & Frames Hot Foil Dies [ 170064 ]](https://lisascreativecorner.com/wp-content/uploads/2026/07/8ec7dc9e09a5fba041710e417a77d0da.jpg "Flourish & Frames Hot Foil Dies [ 170064 ]")
![Sweetly Sentimental Hot Foil Dies (English) [ 170052 ]](https://lisascreativecorner.com/wp-content/uploads/2026/07/a12ee5a9038ae5579e17f14f655dc4b8-1.jpg "Sweetly Sentimental Hot Foil Dies (English) [ 170052 ]")
![Nature's Symphony Dies [ 166925 ]](https://lisascreativecorner.com/wp-content/uploads/2026/07/1e6e2acd71008bd4ee0796dd559b2c5a.jpg "Nature's Symphony Dies [ 166925 ]")
![Gold Stampin' Hot Foil Rolls [ 170066 ]](https://lisascreativecorner.com/wp-content/uploads/2026/07/0b06e7bcd39174c2711511e21a2ee790-2.jpg "Gold Stampin' Hot Foil Rolls [ 170066 ]")
![Basic White 8 1/2" X 11" Cardstock [ 166780 ]](https://lisascreativecorner.com/wp-content/uploads/2026/07/a372c999e3e7e785c75dd7bad5bad3e4-2.jpg "Basic White 8 1/2\" X 11\" Cardstock [ 166780 ]")
![Hydrangea Hue 12" X 12" (30.5 X 30.5 Cm) Two Tone Cardstock [ 167696 ]](https://lisascreativecorner.com/wp-content/uploads/2026/07/5466e5394f228c1b541456871e374503.jpg "Hydrangea Hue 12\" X 12\" (30.5 X 30.5 Cm) Two Tone Cardstock [ 167696 ]")
![Adhesive Sheets [ 152334 ]](https://lisascreativecorner.com/wp-content/uploads/2026/07/fd31cfc385d68cb462b3d3ea84503f12-1.jpg "Adhesive Sheets [ 152334 ]")
![Multipurpose Liquid Glue [ 110755 ]](https://lisascreativecorner.com/wp-content/uploads/2026/07/cbf2e687070fce5a1db2dd5ae70f80bd-1.jpg "Multipurpose Liquid Glue [ 110755 ]")
![Stampin' Dimensionals [ 104430 ]](https://lisascreativecorner.com/wp-content/uploads/2026/07/40efb008ee05b6faec44ebafc8937e58-2.jpg "Stampin' Dimensionals [ 104430 ]")