
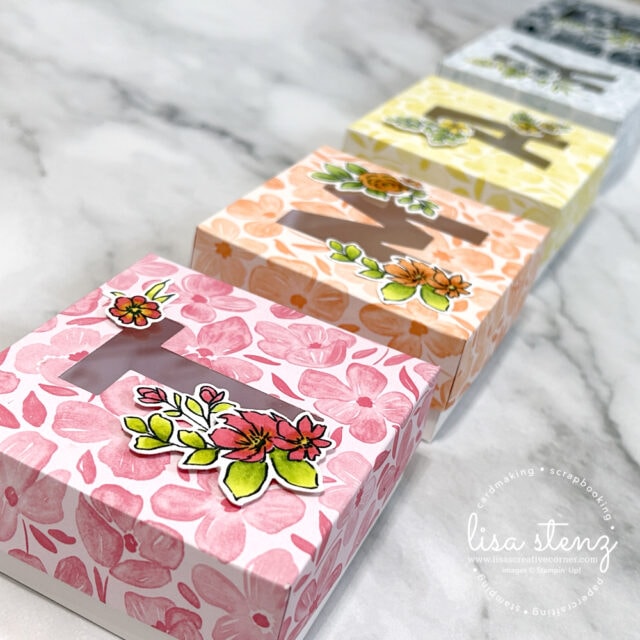
Party Alphabet Mini Gift Boxes
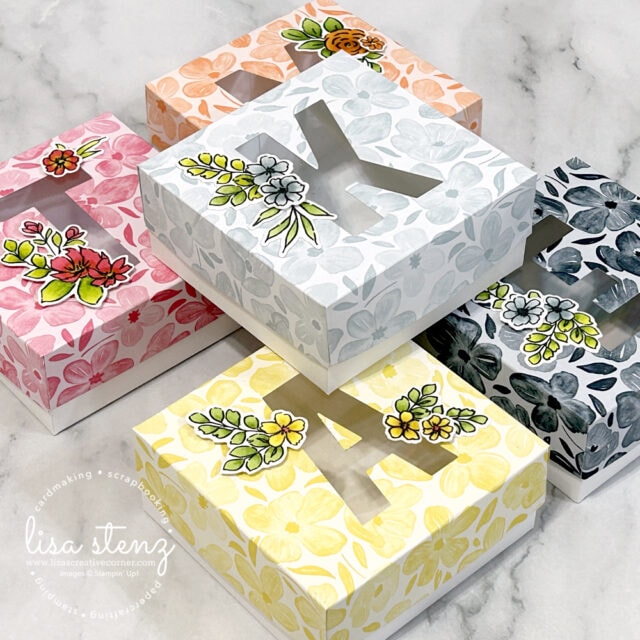
I had so much fun creating these adorable mini gift boxes for everyone attending my Free Craft Day/Open House this Saturday!
These cute boxes were inspired by the sweet little box featured on page 87 of the new 2025–2026 Stampin’ Up! Annual Catalog. I wanted to add a personal touch for my guests, and these little treat boxes are the perfect way to say thank you for stopping by.
How I Made Them:
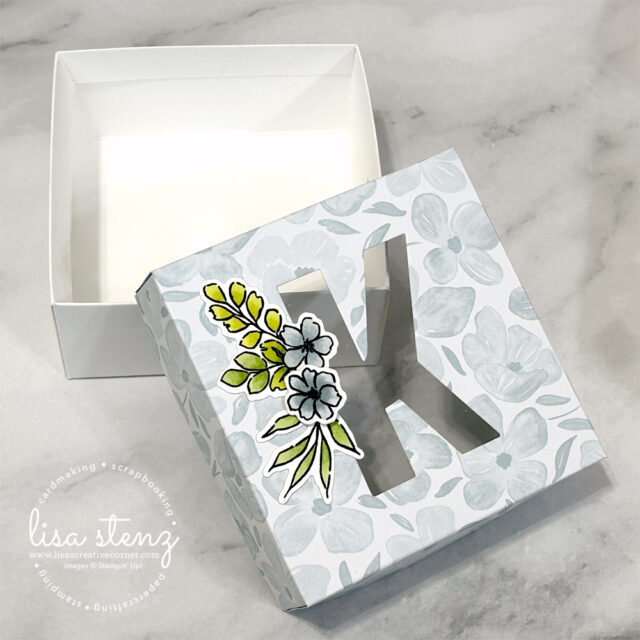
- Box Base: I used Basic White Thick Cardstock cut to 7 7⁄16″ x 7 7⁄16″ and scored each side at ½” and 2″.
- Box Lid: I used a piece of 6″ x 6″ 2025–2027 In Color Designer Series Paper, scoring it at ¼” and 1¼”.
- Before assembling the lids, I die-cut a monogram letter using the Party Alphabet Dies in the center and added a 3¼” x 3¼” Window Sheet behind the opening to give it a peek-through effect.
- To embellish them, I stamped the gorgeous flowers from the Extraordinary Flora stamp set in Memento Black Ink and colored them using various Stampin’ Blends Markers. I then die-cut the flowers using the coordinating die and popped them up on the lids with Mini Dimensionals.
Each box will be filled with little treats for my guests to enjoy! 🍬
You’re Invited to My Free Craft Day/Open House!
It’s not too late to join the fun! Come craft with us this Saturday, May 24th at my home in Temecula, CA from 12pm–4pm PDT.
Here’s what you can look forward to:
- 🛠 Bring unfinished projects or start something new
- 🛍 Choose from a variety of project kits available for purchase
- 🆕 Pick up your brand new 2025–2026 Stampin’ Up! Annual Catalog
- 🎨 Use my inks, markers, cardstock scraps, and die cut machine
- 🧷 Bring your own adhesive or grab some here if you need it
- 🧑🏫 Get help using tools or learn fun new techniques from me
- 🎁 Win fun door prizes throughout the day
- ⭐️ Bonus: Bring a friend and you’ll both get a surprise goodie!
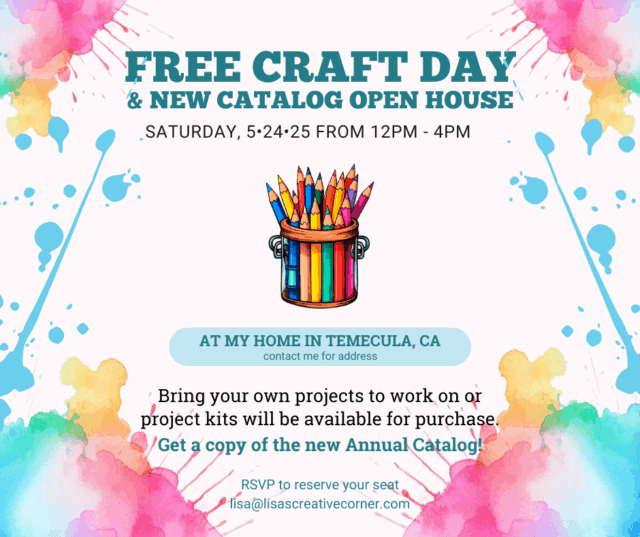
📍 Location: My home in Temecula, CA (message me for the address)
⏰ Date & Time: Saturday, May 24 • 12:00pm – 4:00pm PDT
📩 RSVP by May 23 if you’d like me to save you a crafting spot — otherwise, feel free to just drop in anytime!
Let’s craft, chat, and celebrate the new catalog together. I can’t wait to see you there! 🩷
Product List![Extraordinary Flora Bundle (English) [ 165245 ]](https://lisascreativecorner.com/wp-content/uploads/2025/05/afdd08be271fbf825689b9674780a4f4-1.jpg "Extraordinary Flora Bundle (English) [ 165245 ]")
![Party Alphabet Dies [ 165263 ]](https://lisascreativecorner.com/wp-content/uploads/2025/05/b9d178799165cecc6336b7bccfc909b4-1.jpg "Party Alphabet Dies [ 165263 ]")
![2025–2027 In Color™ 6" X 6" (15.2 X 15.2 Cm) Designer Series Paper [ 165300 ]](https://lisascreativecorner.com/wp-content/uploads/2025/05/7315ae3f8e065354e28966a9391a32bf.jpg "2025–2027 In Color™ 6\" X 6\" (15.2 X 15.2 Cm) Designer Series Paper [ 165300 ]")
![Basic White 8 1/2" X 11" Thick Cardstock [ 159229 ]](https://lisascreativecorner.com/wp-content/uploads/2025/05/8c2a8a3b8ff25be10ec2d7cecdaecf11-3.jpg "Basic White 8 1/2\" X 11\" Thick Cardstock [ 159229 ]")
![Window Sheets [ 142314 ]](https://lisascreativecorner.com/wp-content/uploads/2025/05/ceeaf06bbab5343945436352a70657d6-2.jpg "Window Sheets [ 142314 ]")
![Tuxedo Black Memento Ink Pad [ 132708 ]](https://lisascreativecorner.com/wp-content/uploads/2025/05/89bd7278b062cae183ee334b221c9dcd-1.jpg "Tuxedo Black Memento Ink Pad [ 132708 ]")
![Secret Sea Stampin’ Blends Combo Pack [ 165289 ]](https://lisascreativecorner.com/wp-content/uploads/2025/05/3d6a0fdee4136c9c243a7ba1d8ec776d.jpg "Secret Sea Stampin’ Blends Combo Pack [ 165289 ]")
![Cloud Cover Stampin’ Blends Combo Pack [ 165287 ]](https://lisascreativecorner.com/wp-content/uploads/2025/05/bb2bed3b619b4cccac381c7812757f66.jpg "Cloud Cover Stampin’ Blends Combo Pack [ 165287 ]")
![Timid Tiger Stampin’ Blends Combo Pack [ 165291 ]](https://lisascreativecorner.com/wp-content/uploads/2025/05/5c71790752d4839ff78c1a8af0a82b91.jpg "Timid Tiger Stampin’ Blends Combo Pack [ 165291 ]")
![Darling Duckling Stampin’ Blends Combo Pack [ 165288 ]](https://lisascreativecorner.com/wp-content/uploads/2025/05/c988bbe200b1553efbc4e3a03538d767.jpg "Darling Duckling Stampin’ Blends Combo Pack [ 165288 ]")
![Daffodil Delight Stampin' Blends Combo Pack [ 154883 ]](https://lisascreativecorner.com/wp-content/uploads/2025/05/74650ec0bf0c828591e13622576cf871.jpg "Daffodil Delight Stampin' Blends Combo Pack [ 154883 ]")
![Strawberry Slush Stampin’ Blends Combo Pack [ 165290 ]](https://lisascreativecorner.com/wp-content/uploads/2025/05/1a2d9670a16265d1b247552c23f871a2.jpg "Strawberry Slush Stampin’ Blends Combo Pack [ 165290 ]")
![Granny Apple Green Stampin' Blends Combo Pack [ 154885 ]](https://lisascreativecorner.com/wp-content/uploads/2025/05/2abbe2f3b7b62ac60f6133d08fdec3b3-1.jpg "Granny Apple Green Stampin' Blends Combo Pack [ 154885 ]")
![Lemon Lime Twist Stampin’ Blends Combo Pack [ 161682 ]](https://lisascreativecorner.com/wp-content/uploads/2025/05/2f4c1af3082e6f5fee282668103c8a0b.jpg "Lemon Lime Twist Stampin’ Blends Combo Pack [ 161682 ]")
![Stampin' Seal [ 152813 ]](https://lisascreativecorner.com/wp-content/uploads/2025/05/8ad19e7fd7701102be118684d71a6e6d-1.jpg "Stampin' Seal [ 152813 ]")
![Mini Stampin' Dimensionals [ 144108 ]](https://lisascreativecorner.com/wp-content/uploads/2025/05/dd5ef75bd31a32ecdc6a140a2d9ad7db-2.jpg "Mini Stampin' Dimensionals [ 144108 ]")
![Stampin' Cut & Emboss Machine [ 149653 ]](https://lisascreativecorner.com/wp-content/uploads/2025/05/909f32cc4d93a35369fa22db36e19902-3.jpg "Stampin' Cut & Emboss Machine [ 149653 ]")

these boxes are so cute….on the scoring, can you give a bit more detail about scoring on each side? I am confused on this part of the instructions provided….thank you!
Hi Lori. I’m so glad you like the boxes. Without photos or a video, I know my instructions are a bit confusing. So sorry about that. After cutting the cardstock to the sizes indicated, you will want to score them on each side twice using the measurements I shared. This is so that you can fold down and add adhesive to the first scoreline to create a thicker “lip” around the edges of the box to make it more sturdy. I’m not sure if that makes sense. When I get caught up on my current projects/deadlines, I’d be happy to record a video showing exactly how I make these boxes. Or, if you email me, I can send you a quick sketch of how I score them.
Hi Lisa,
I love these mini gift boxes. Do you have a diagram to show where to cut the cardstock once scored to make the box.
Thanks.
Hi Beth. I don’t have a diagram at the moment, but I plan to record a video soon showing how to make the boxes. Stay tuned…
good morning Lisa. Can I get a diagram of the cutting for this box please? thanks so much for sharing