February Project Kit: Beautifully Celebrated Banner
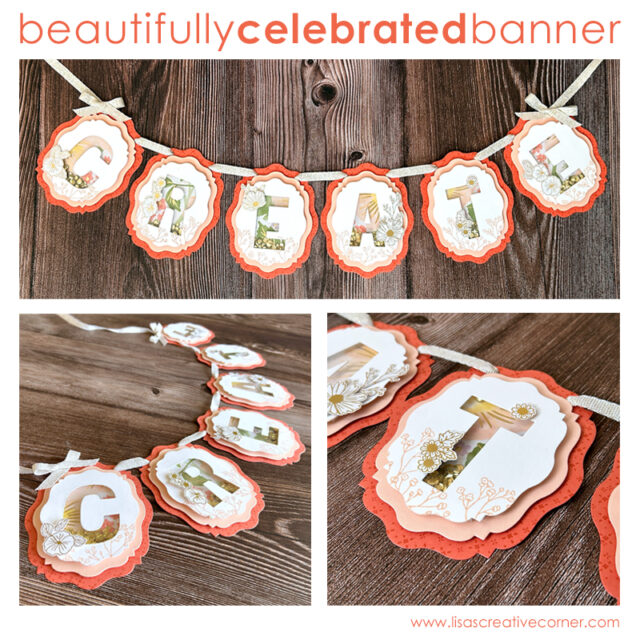
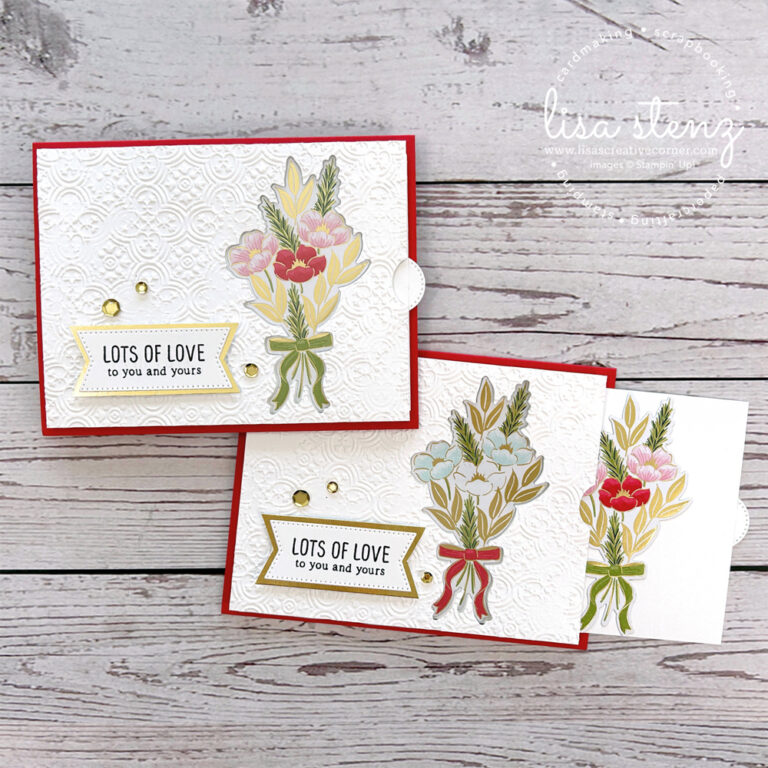
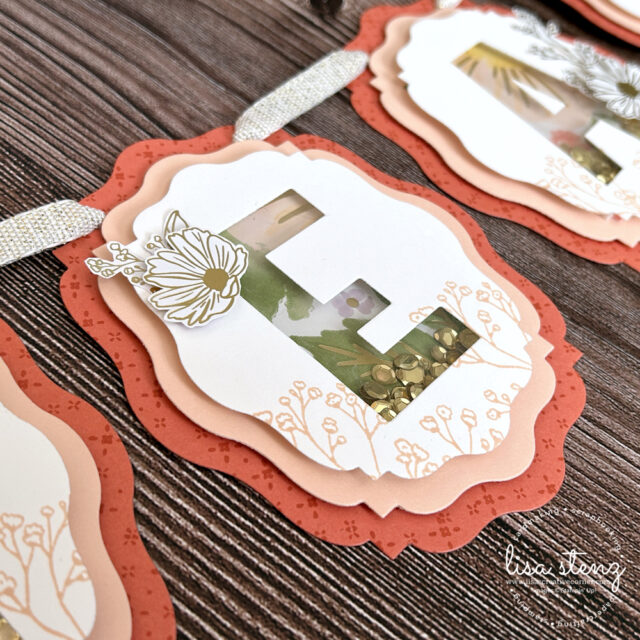
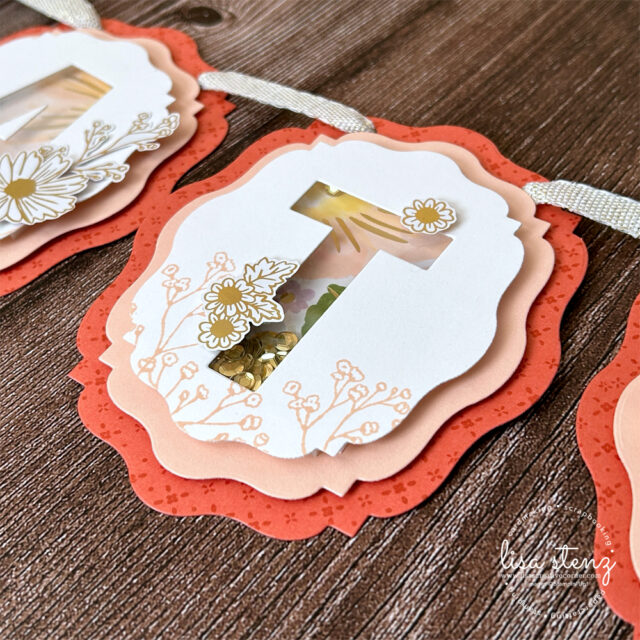
This month’s project kit is all about celebrating what matters most to you! We’ll be creating a pretty, customizable banner with shaker elements using Stampin’ Up’s Beautifully Celebrated Stamp & Die Bundle paired with the coordinating Lovely & Beautiful Designer Series Paper. The best part? You can personalize your banner with any word or phrase you choose, making it perfect for birthdays, welcoming a new baby, or decorating for any special occasion. For my sample, I chose the word Create and can’t wait to hang it in my craft room for daily inspiration. You’ll find links to all the supplies needed at the bottom of this post.*
February Project Kit – Free with Purchase!
When you order the Beautifully Celebrated Stamp & Die Bundle (or the full Lovely & Beautiful Suite which includes the bundle) during February, I’ll send you a FREE project kit as a special thank you!
Your kit will include:
- All the cardstock pieces you’ll need to make a 6 letter word (you’ll do the die cutting)
- A full color, printed, step-by-step instruction guide with photos
- FREE shipping on the kit
Kits will be shipped by the end of the month.
*See the full supply list below to make sure you have the rest of the supplies to complete the project.
Prefer the full step-by-step tutorial guide only? You can purchase the PDF file separately here.
Another way to get all my tutorials for FREE:
One of the perks of being on my Stampin’ Up! team is that I share all of my project guides for free in our private team Facebook group! Visit my New Demonstrator FAQ page here for more information.
A Closer Look at the Project
See the photos below for more details on this fun project.

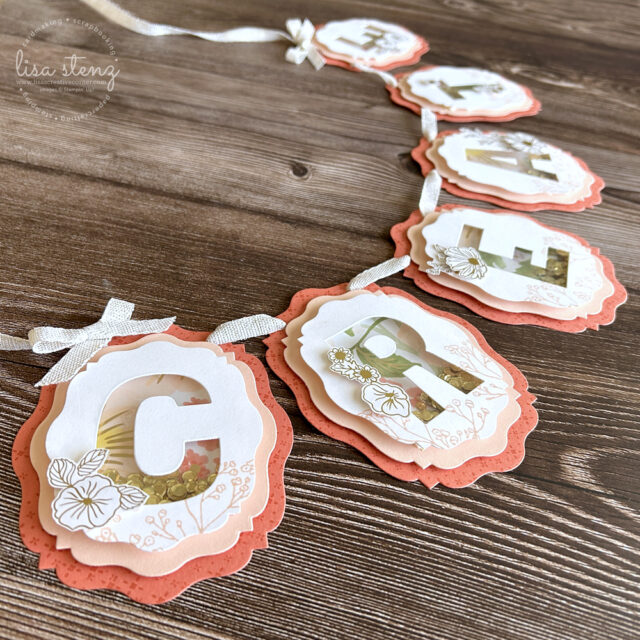
Each letter features a fun shaker element, allowing the loose gold sequins to move freely and sparkle inside.
Don’t Forget!
When you order the Beautifully Celebrated Stamp & Die Bundle (or the full Lovely & Beautiful Suite which includes the bundle) during February, you’ll receive:
✔️ All the cardstock pieces you’ll need to make a 6 letter word (you’ll do the die cutting)
✔️ Printed step-by-step instruction guide
✔️ FREE shipping
*See below for the full supply list to make sure that you have the additional supplies needed to make the project.
All absolutely FREE just for ordering through me!
And, as always, your order will also earn:
- Stampin’ Rewards (when you opt in with your Stampin’ Up! online account)
- Points toward Lisa’s Loyalty Rewards Program
- Go towards qualifying for the Product of the Month
Prefer the full step-by-step tutorial guide only? Purchase the PDF file here.
Click on the links below to order the supplies for this project.
Product List![Beautifully Celebrated Bundle (English) [ 166975 ]](https://lisascreativecorner.com/wp-content/uploads/2026/02/3948b1edcb6809b97f93bb208b0ffafd.jpg "Beautifully Celebrated Bundle (English) [ 166975 ]")
![Lovely & Beautiful 12" X 12" (30.5 X 30.5 Cm) Specialty Designer Series Paper [ 166957 ]](https://lisascreativecorner.com/wp-content/uploads/2026/02/683d67d76c42ab0d311b13fc0682641c.jpg "Lovely & Beautiful 12\" X 12\" (30.5 X 30.5 Cm) Specialty Designer Series Paper [ 166957 ]")
![Party Alphabet Dies [ 165263 ]](https://lisascreativecorner.com/wp-content/uploads/2026/02/b9d178799165cecc6336b7bccfc909b4.jpg "Party Alphabet Dies [ 165263 ]")
![Loose Gold Sequins [ 165267 ]](https://lisascreativecorner.com/wp-content/uploads/2026/02/36a6ab3e6b01d8f71590817dc4b2ef2f.jpg "Loose Gold Sequins [ 165267 ]")
![White With Gold 3/8" (1 Cm) Ribbon [ 166979 ]](https://lisascreativecorner.com/wp-content/uploads/2026/02/51d357b509b50962a6afb0100a8394ba.jpg "White With Gold 3/8\" (1 Cm) Ribbon [ 166979 ]")
![Window Sheets [ 142314 ]](https://lisascreativecorner.com/wp-content/uploads/2026/02/ceeaf06bbab5343945436352a70657d6.jpg "Window Sheets [ 142314 ]")
![Calypso Coral 8-1/2" X 11" Cardstock [ 122925 ]](https://lisascreativecorner.com/wp-content/uploads/2026/02/3ee30067f3e0bd8e3a1a0310a6331518.jpg "Calypso Coral 8-1/2\" X 11\" Cardstock [ 122925 ]")
![Petal Pink 8-1/2" X 11" Cardstock [ 146985 ]](https://lisascreativecorner.com/wp-content/uploads/2026/01/71810bd804cb036c54a068250576c418.jpg "Petal Pink 8-1/2\" X 11\" Cardstock [ 146985 ]")
![Basic White 8 1/2" X 11" Thick Cardstock [ 159229 ]](https://lisascreativecorner.com/wp-content/uploads/2025/11/8c2a8a3b8ff25be10ec2d7cecdaecf11.jpg "Basic White 8 1/2\" X 11\" Thick Cardstock [ 159229 ]")
![Petal Pink Classic Stampin' Pad [ 147108 ]](https://lisascreativecorner.com/wp-content/uploads/2026/02/00eb5f98b90da0b5f3f69b992c3817d5.jpg "Petal Pink Classic Stampin' Pad [ 147108 ]")
![Calypso Coral Classic Stampin' Pad [ 147101 ]](https://lisascreativecorner.com/wp-content/uploads/2026/02/c942ddbb615ad5734a0de1fa0de15f7d.jpg "Calypso Coral Classic Stampin' Pad [ 147101 ]")
![Foam Adhesive Strips [ 141825 ]](https://lisascreativecorner.com/wp-content/uploads/2026/02/e2fbd3cb39d3e16b0b0b5b3f0b43ea8d.jpg "Foam Adhesive Strips [ 141825 ]")
![Stampin' Dimensionals [ 104430 ]](https://lisascreativecorner.com/wp-content/uploads/2025/11/40efb008ee05b6faec44ebafc8937e58.jpg "Stampin' Dimensionals [ 104430 ]")
![Mini Stampin' Dimensionals [ 144108 ]](https://lisascreativecorner.com/wp-content/uploads/2025/11/dd5ef75bd31a32ecdc6a140a2d9ad7db.jpg "Mini Stampin' Dimensionals [ 144108 ]")
![Stampin' Seal [ 152813 ]](https://lisascreativecorner.com/wp-content/uploads/2026/02/8ad19e7fd7701102be118684d71a6e6d.jpg "Stampin' Seal [ 152813 ]")
![Stampin' Cut & Emboss Machine [ 149653 ]](https://lisascreativecorner.com/wp-content/uploads/2025/11/909f32cc4d93a35369fa22db36e19902.jpg "Stampin' Cut & Emboss Machine [ 149653 ]")