
How to Create Flowers & Leaves without a Flower or Leaf Die
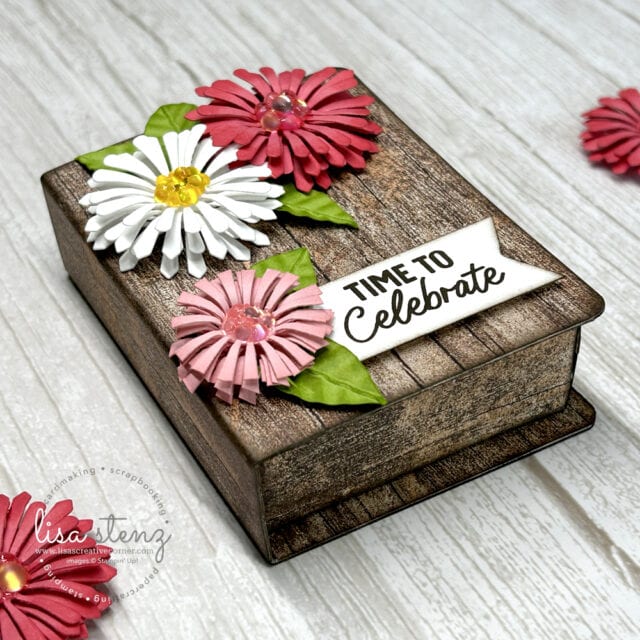
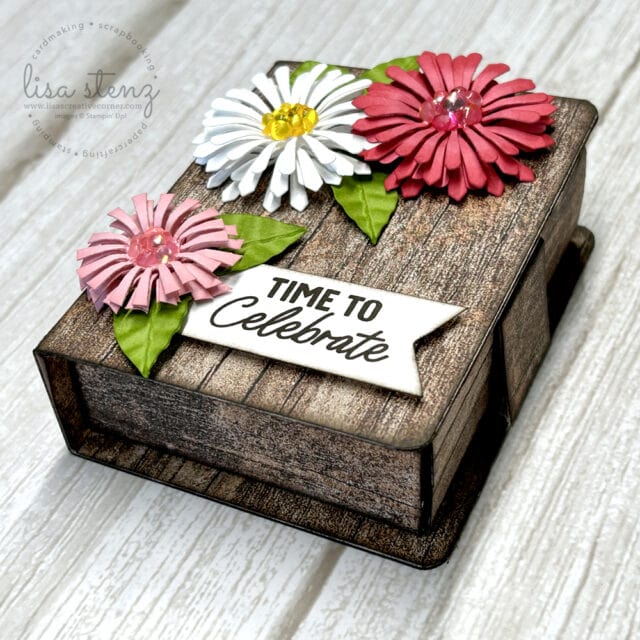
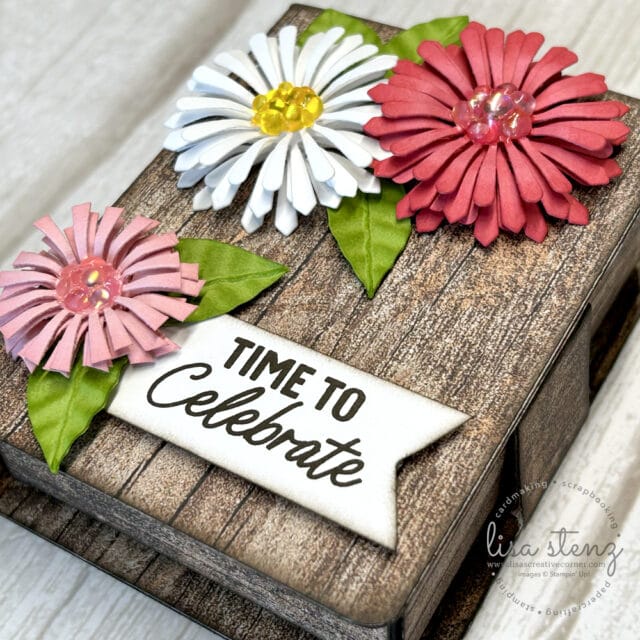
I had so much fun creating the flowers and leaves for this adorable Book Treat Box, and I couldn’t wait to share the process with you! If you’ve been eyeing the Round We Go Bundle, you’ll love this fun twist! I wanted to create some dimensional flowers and realized the flat little pinwheels in the set were perfect for layering. With just a few simple steps, they turned into lovely 3D flowers that added the perfect pop to this project. You can even use other round shapes to create flowers if you don’t have a flower die.
🌸 Creating the 3D Flowers
To build the flowers, I layered several of the pinwheel die-cuts on top of one another with Mini Dimensionals, slightly offsetting each layer. This simple technique gives a full, dimensional look that makes the flowers really stand out. You can create this same look with other round dies that you might have in your stash. For the center of the flowers, I used the Fine Tip Glue Pen to add some Loose Frosted Dots which add the perfect touch of sparkle and dimension! To create the smaller flower, I simply trimmed the ends off of the pinwheel die cuts before adhering them together.
🍃 Making the Leaves
For the leaves, I wanted to add a bit of texture, so I reached for the Mini Corrugated 3D Embossing Folder. After folding a small piece of Granny Apple Green cardstock in half, I placed it in the embossing folder at an angle. (Don’t have the Mini Corrugated Embossing Folder? Try crinkling up the cardstock instead.) Then I simply cut leaf shapes by hand before unfolding the cardstock. I also sponged a bit of Granny Apple Green ink onto the embossed leaves. The corrugated texture and touch of ink adds a bit of detail.
🎥 Want to see how it all comes together?
Check out the video below where I walk you through the entire process, step by step!
🎁 Treat Box Details
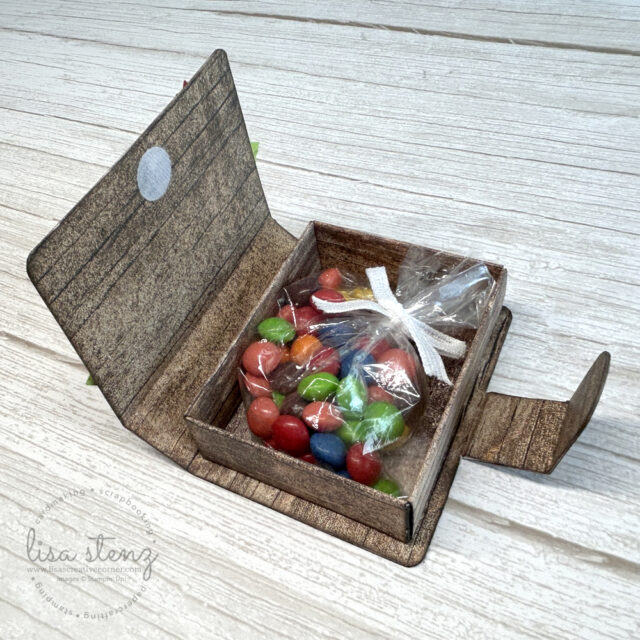
To make the box itself, I used a Book Treat Box and covered it with a piece of Country Woods DSP for a rustic, charming base. I inked the edges with some Early Espresso ink to cover the seams. To keep it securely closed, I added a small Velcro Dot on the inside of the lid and on the top of the flap. It’s a super easy way to keep the box closed! For some reason the dots that I had on hand had one clear piece and one white piece. In the future I will use these Velcro Dots which are clear on both sides. I added a little bag of candy on the inside, but you can put just about anything inside.
✂️ Full Supply List
You’ll find everything you need to recreate this project right at the bottom of the page.
I hope this project inspires you to play around with your supplies in new and creative ways! Let me know if you try it. I’d love to see what you come up with.
Product List![Round We Go Bundle (English) [ 163730 ]](https://lisascreativecorner.com/wp-content/uploads/2025/04/cf34cb76d2e260709fe871d197110b12.jpg "Round We Go Bundle (English) [ 163730 ]")
![Mini Corrugated 3 D Embossing Folder [ 165559 ]](https://lisascreativecorner.com/wp-content/uploads/2025/04/da48576757fa66a84921a8364dceb968.jpg "Mini Corrugated 3 D Embossing Folder [ 165559 ]")
![Book Treat Boxes [ 164048 ]](https://lisascreativecorner.com/wp-content/uploads/2025/04/97aa0f9cb60950c82c346090b028dd26.jpg "Book Treat Boxes [ 164048 ]")
![Country Woods 12" X 12" (30.5 X 30.5 Cm) Designer Series Paper [ 163393 ]](https://lisascreativecorner.com/wp-content/uploads/2025/04/9dcffbfc45259a9e2f66489331eb9975.jpg "Country Woods 12\" X 12\" (30.5 X 30.5 Cm) Designer Series Paper [ 163393 ]")
![Loose Frosted Dots [ 161153 ]](https://lisascreativecorner.com/wp-content/uploads/2025/04/86d839d12f19b061d9c6857da6c836f3.jpg "Loose Frosted Dots [ 161153 ]")
![Strawberry Slush 8-1/2" X 11" Card Stock [ 131295 ] (Retired)](https://lisascreativecorner.com/wp-content/uploads/2025/04/8775d15aa0d46c121c94dc439c1c7ecb.jpg "Strawberry Slush 8-1/2\" X 11\" Card Stock [ 131295 ] (Retired)")
![Pretty In Pink 8 1/2" X 11" Cardstock [ 163793 ]](https://lisascreativecorner.com/wp-content/uploads/2025/04/df4408d498a24e84ca6d41189326ca0b.jpg "Pretty In Pink 8 1/2\" X 11\" Cardstock [ 163793 ]")
![Granny Apple Green 8-1/2" X 11" Cardstock [ 146990 ]](https://lisascreativecorner.com/wp-content/uploads/2025/04/d13546e4311e21d711ec5569f986f9d5-2.jpg "Granny Apple Green 8-1/2\" X 11\" Cardstock [ 146990 ]")
![Basic White 8 1/2" X 11" Thick Cardstock [ 159229 ]](https://lisascreativecorner.com/wp-content/uploads/2025/04/8c2a8a3b8ff25be10ec2d7cecdaecf11-1.jpg "Basic White 8 1/2\" X 11\" Thick Cardstock [ 159229 ]")
![Granny Apple Green Stampin' Pad [ 147095 ]](https://lisascreativecorner.com/wp-content/uploads/2025/04/af646a941b19b0674dcf09f21a858b7e.jpg "Granny Apple Green Stampin' Pad [ 147095 ]")
![Pretty In Pink Classic Stampin Pad [ 163807 ]](https://lisascreativecorner.com/wp-content/uploads/2025/04/b9949d11829c9769e26f508a662f2df8.jpg "Pretty In Pink Classic Stampin Pad [ 163807 ]")
![Early Espresso Classic Stampin' Pad [ 147114 ]](https://lisascreativecorner.com/wp-content/uploads/2025/04/847b0318bad12e9bb38749cb4c42503a.jpg "Early Espresso Classic Stampin' Pad [ 147114 ]")
![Strawberry Slush Classic Stampin' Pad [ 131178 ] (Retired)](https://lisascreativecorner.com/wp-content/uploads/2025/04/0a51ddd999e7432deb88abd7442b402c.jpg "Strawberry Slush Classic Stampin' Pad [ 131178 ] (Retired)")
![Sponge Daubers [ 133773 ]](https://lisascreativecorner.com/wp-content/uploads/2025/04/967ade1993a15d8f7edfa352753233e4.jpg "Sponge Daubers [ 133773 ]")
![Mini Stampin' Dimensionals [ 144108 ]](https://lisascreativecorner.com/wp-content/uploads/2025/04/dd5ef75bd31a32ecdc6a140a2d9ad7db-2.jpg "Mini Stampin' Dimensionals [ 144108 ]")
![Fine-Tip Glue Pen [ 138309 ]](https://lisascreativecorner.com/wp-content/uploads/2025/04/b4bf80688efb6a58e1f516524aa9ce56.jpg "Fine-Tip Glue Pen [ 138309 ]")
![Multipurpose Liquid Glue [ 110755 ]](https://lisascreativecorner.com/wp-content/uploads/2025/04/cbf2e687070fce5a1db2dd5ae70f80bd-2.jpg "Multipurpose Liquid Glue [ 110755 ]")
![Paper Snips [ 103579 ]](https://lisascreativecorner.com/wp-content/uploads/2025/04/1f09970097ea400c79ec2e42d288fffe-1.jpg "Paper Snips [ 103579 ]")
![Take Your Pick [ 144107 ]](https://lisascreativecorner.com/wp-content/uploads/2025/04/850345bd697d58c5374f00ec11962bda-1.jpg "Take Your Pick [ 144107 ]")
![Take Your Pick Crafter Tips [ 161602 ]](https://lisascreativecorner.com/wp-content/uploads/2025/04/0f86b8d5a5c2b695188bcbe76d95c7f6-1.jpg "Take Your Pick Crafter Tips [ 161602 ]")
![Bone Folder [ 102300 ]](https://lisascreativecorner.com/wp-content/uploads/2025/04/6b524a0aeffee20b743ca2e3ea9172b4.jpg "Bone Folder [ 102300 ]")
![Simply Scored [ 122334 ]](https://lisascreativecorner.com/wp-content/uploads/2025/04/084b07971e19a73505487bdc02df7d30-1.jpg "Simply Scored [ 122334 ]")
![Stampin' Cut & Emboss Machine [ 149653 ]](https://lisascreativecorner.com/wp-content/uploads/2025/04/909f32cc4d93a35369fa22db36e19902-3.jpg "Stampin' Cut & Emboss Machine [ 149653 ]")


WOW! I’ve been going back and forth about this bundle. This box looks stunning!
I’m so glad you like it! It was really fun to make! 🌸