
Easter Box and Free Stamp Set
3D Items | Boxes | Contests | Cricut | CTMH | Demonstrator Opportunities | Gifts | Giveaway | Uncategorized
Would you like to win a free stamp set? Read to the bottom of this post to see how you can win either the Greatest Love set or the “spring-themed” Love This set.
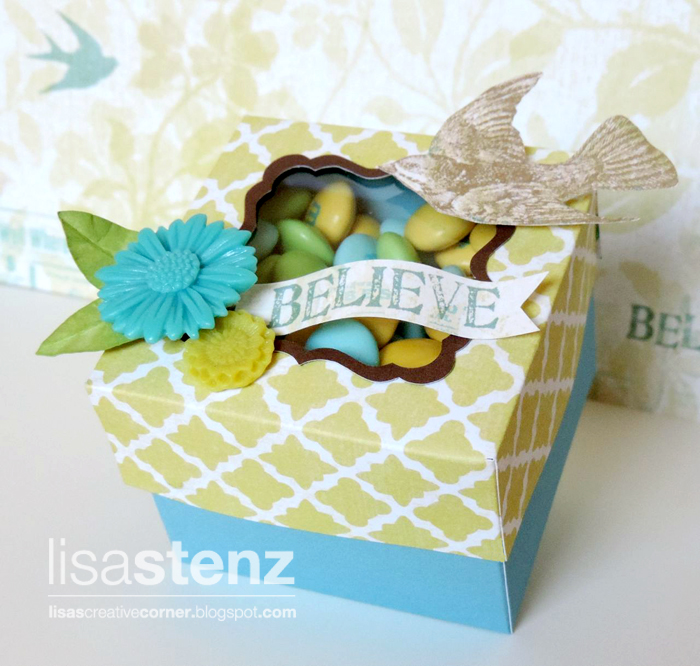
This mini box was created using the Artiste Cricut Cartridge (click here to see how you can get it free this month) and the beautiful Skylark Collection (which is in the New Consultant Kit.)
I brought the box image from page 69 of the Artiste Cricut booklet into Design Space and enlarged the grouped file to 12.25″ wide. I ungrouped the images and cut the top of the box from a piece of patterned paper from the Skylark Paper Collection. Then I trimmed ½” off each edge. The bottom of the box was cut from a piece of Crystal Blue cardstock. I also cut a thin Chocolate cardstock frame using the bracket shape that coordinates with the opening on the top of the box.
I used some of the resin flowers from the Skylark Assortment, a small piece of Sweet Leaf cardstock (for the leaves), and cut out some images from the paper to decorate the box. I cut a small piece of the acetate from the resin flowers and attached it to the inside of the box under the opening with some Glue Dots.
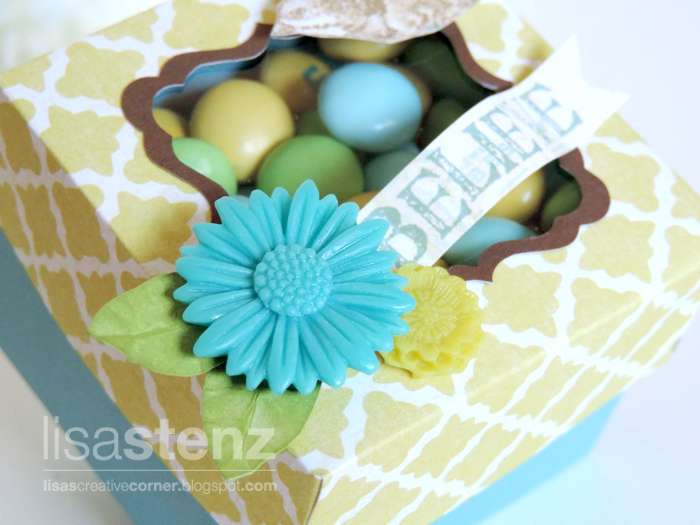
I filled the box with some yummy Easter themed M&Ms. Now the fun part…can you guess how many M&Ms are inside the box? (I’ll give you a hint. The final size of the box is 2½” wide and 2″ tall.) The person who guesses the closest to the actual number of M&Ms in the box will win their choice of the Greatest Love set or the “spring-themed” Love This set. The winner will be announced here on my blog and on my CTMH Facebook page on Monday morning. Post your best guess in the comments section below…
Greatest Love stamp set

Love This stamp set

Have a blessed Easter weekend!


I'm guessin' about 374.. LOL!!
And what an AWESOME stamp set, it's soo cute..
I LOVE IT!!
L.r. Smith from fb pg..
Thanks for guessing. Good luck! *Ü*
I think there are 222
Thanks for guessing Roxana. Good luck! *Ü*
I think 189. Beautiful work!
Thanks for the compliment on my project and for posting your guess. Good luck! *Ü*
i'll take a stab and say 55
upnurse at aol dot com
I'll guess 240 yummy M&Ms are inside that beautiful box. You are so creative, Lisa. The Skylark papers are just gorgeous!
106
Thanks for posting your guess. Good luck!
I'm going to guess 160. That box is adorable!
I guess 164.
Thanks for posting your guess. Good luck!
Very cute idea! My guess is 288. Have a happy Easter, Lisa! Donna K. from your Creative Club.
What a beautiful box! My guess is 224.
212 ! Happy Easter!
Thanks for posting your guess. Good luck!
Love the box. My guess is 267.
I'm so impressed that you took out all of the pink ones so the colors would match your paper! My guess is 400!
Thanks for posting your guess. Good luck! (It is fun to make the M&M colors match. LOL!)
I am going to guess 55. Love the box!!
Your box is so pretty! If you're still taking guess, I think there are 135.
Love all your artwork 🙂
Love it! I guess 119.
Thanks for posting your guess. Good luck!
I love this box and would love to recreate it. I'm just confused about when you say you ungrouped it. Also what size did you use for coordinating chocolate bracket? Thank you so much for your help with this.
Hi AmyBeth,
Some of the images from our cartridges are grouped together in Design Space unlike when you use Craft Room or just cut directly from the machine. (Design Space is the new program that is used with the new Explore machine.) So when I brought the box image into Design Space, it also brought the lid in at the same time and they were grouped together.
Unfortunately I didn't save the bracket frame for some reason so I don't know what size I cut it. I'm so sorry. You can probably just bring the bracket image in (either in CCR or DS) and place it on top of the cut out on the top of the box and size it that way. Then make another bracket that is a bit larger and weld the image together to get the frame.
Hope that helps a bit. *Ü*
That makes sense now. Thanks for you help.